Open topic with navigation
Excel Integrated Reporting
How much time do you spend retrieving accounts information requested by other people? Whether you're an accountant, bookkeeper, company director or the owner of a small business, the chances are you've needed to access financial data from Sage Accounts at some time. When you need to produce accounting information outside of Sage Accounts in a worksheet format, Excel Integrated Reporting is perfect for accessing and manipulating the data you need, saving you lots of time.
Anyone who's familiar with Excel® will soon feel at home using Excel Integrated Reporting. If you're a novice with Microsoft Excel don't worry, this guide will help you to understand the basics of Excel Integrated Reporting, so that you’ll feel confident about creating a new Excel® workbook based on your accounts data. As you become more experienced, you can go on to create worksheets of your own and use PivotTables, graphs and other Excel® analysis features.
Excel Integrated Reporting installs on your computer along with Sage Accounts, so you can start using it straight away. If you access your Sage Accounts data from a server, you can use Excel Integrated Reporting from your computer to link to the same data.
Excel Integrated Reporting has two basic components:
- Sage reports - These are reports that you can run to extract data straight onto your worksheet. Simply select the report you want to include in your worksheet, for example, Balance Sheet, and Excel Integrated Reporting inserts the appropriate Sage Accounts data starting from the selected cell. This is an easy way to get large amounts of data from Sage Accounts into your Excel® worksheet, including standard Sage reports or your own custom reports.
- Sage functions - You can use these functions on your worksheet when you want to include individual values from your accounts data. For example, the SgAccBankBalance function displays the balance of a specified bank account on your worksheet.
To start using Excel Integrated Reporting, you need to create a link between Excel® and your Sage Accounts data.
- Sage Accounts > Help > About > Program Details area > Data Directory > note the path for the data directory.
-
Open Excel® > File > Options.
Excel® 2007 - Click the Office button in the top-left corner > click Excel Options.
-
Add-Ins > Manage > choose Excel Add-ins > Go.
-
Ensure any Sage add-ins are selected > OK.
Note: If Sage EIR Add-in is currently disabled, from the Manage drop-down list > choose Disabled Items > Go > select Sage EIR > click Enable > click Close.
-
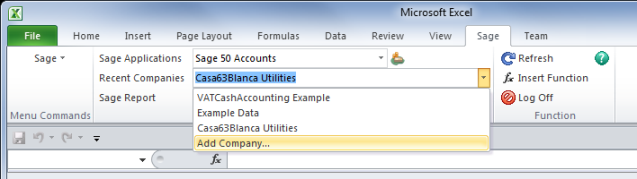
Select the Sage tab > Sage Applications > ensure this shows Sage 50 Accounts > Recent Companies > choose Add Company.
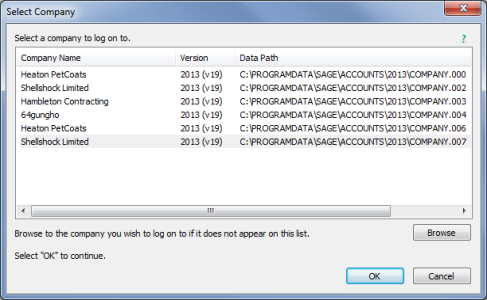
The Select Company window appears:
-
Select a company > OK.
Tip: To use a company that does not appear in this window, Browse > locate the data of the company you want to use > open the Accdata folder > double-click SETUP.DTA. You can check the location of your data in Sage Accounts > Help > About.
-
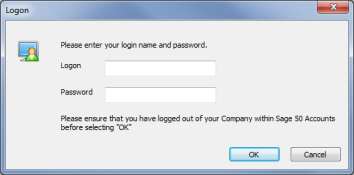
Enter your logon name and password > OK.
Note: When you first install Excel Integrated Reporting, to get access for the first time logon using the MANAGER user name and your associated password. If you don't have a password, leave the Password box blank. If you want others to have access to Excel Integrated Reporting, you must create a user name for each person and assign full access to this feature.
When you save your worksheet, Excel® stores the link to your accounts data, so that you don't have to specify where your data is held each time you open the worksheet.
Once you've set up the link to your accounts data, you can start to use the Sage reports and functions described in the following sections.
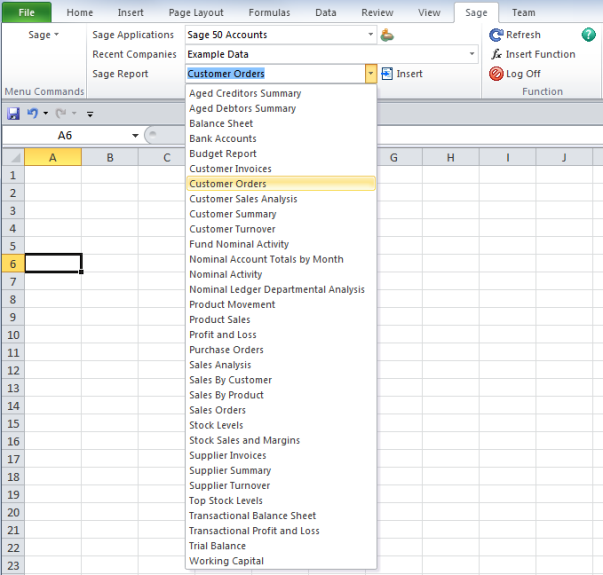
The following example explains how to add the Customer Orders report to your worksheet.
- Select the worksheet cell you want the range to start from, for example, select cell A6.
-
Sage tab > Sage Report > choose Customer Orders > Insert.
-
If a Criteria window appears, enter the criteria you want to use > OK.
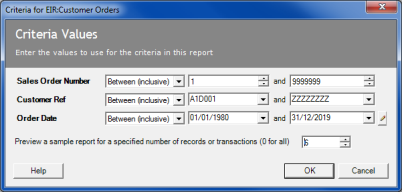
Excel Integrated Reporting inserts the Customer Orders report, starting at the selected cell. Your worksheet should now look something like this:
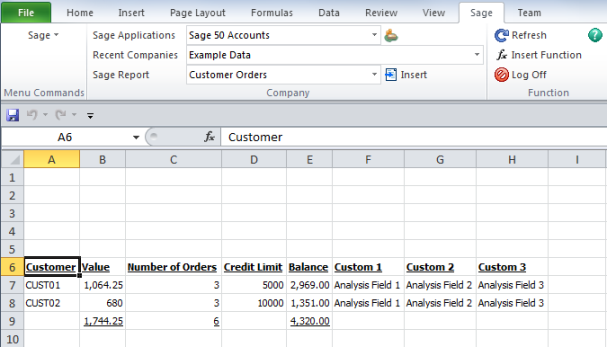
By selecting a Sage Report, you’ve now inserted a summary report of your customers’ orders into your worksheet.
Tip: You can modify the criteria of a Sage Report, such as the date or transaction range. To do this, right-click the report > choose Sage > Modify Criteria.
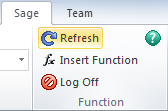
Sage reports link dynamically to your accounts data: if your Sage data changes, you might want your workbook to reflect those changes, or you might not. You can control how your workbook responds to changes in your accounts data using Refresh. You can refresh:
- The whole workbook - Sage tab > Function area > Refresh.
- A report within the workbook - Right-click the report area > choose Sage > Refresh Sage Report.
If you choose not to refresh the Sage data in your workbook, it remains unchanged, regardless of any amendments you make in Sage Accounts.
There are two main types of Sage function:
- List functions - Places drop-down selectors on your worksheet.
- Value functions - Returns text or number values on your worksheet.
The best way to understand Sage functions is to use them, so the following example shows you how to produce a simple customer look-up worksheet to retrieve customer account information from your accounts data.
-
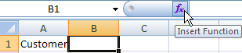
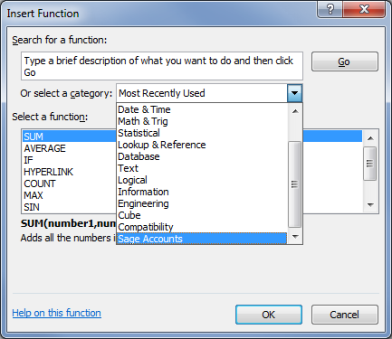
To insert a Sage list function to show a drop-down list of your customers, select cell A1 > enter Customer > select cell B1 > from either the toolbar or the Formulas tab click Insert Function (fx).
-
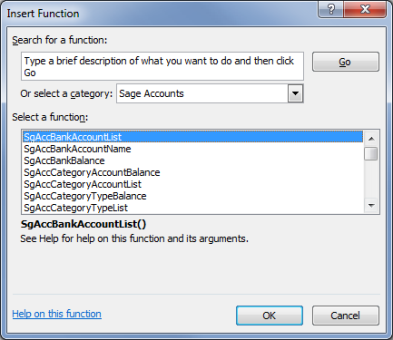
Or select a category drop-down menu > choose Sage Accounts.
-
From the list of Sage functions, select SgAccCustomerList.
Tip: A description of the function appears at the bottom of the Insert Function window.
-
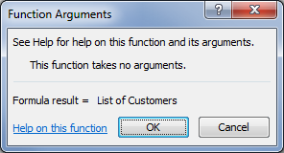
Click OK.
-
Click OK.
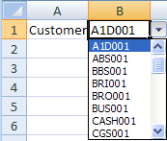
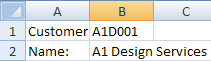
Cell B1 in your worksheet now displays a drop-down which you can click to see a list of your customers. Next you can add a value function to retrieve details for the selected customer.
-
Click cell A2 > enter Customer name > click
cell B2 > from either the toolbar or the Formulas tab click Insert Function (fx).
-
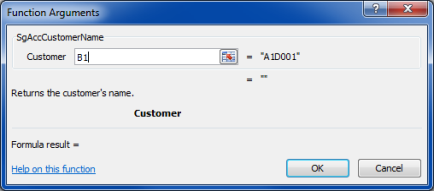
From the list of Sage Accounts functions, select SgAccCustomerName.
-
Function Arguments window > to point the function to the cell that holds the customer account reference, in the argument box enter B1, or click the B1 cell > OK.
Cell B2 now contains the name of the customer account that appears in B1.
To add two more value functions to retrieve the customer's telephone number and credit limit, type labels in cells A3 and A4, such as Phone: and Credit Limit:, then insert the SgAccCustomerPhone function into cell B3 and the SgAccCustomerCreditLimit function into cell B4, as you did before. Remember to type the cell reference for the cell containing your customer account drop-down when adding these new functions.
Your worksheet should now look something like this:
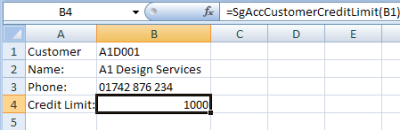
When you select a different customer reference in cell B1, the name, phone and credit limit information automatically updates.
By creating a simple worksheet using just one list function and three value functions, we can quickly look up customer information held in your accounts data, directly from Excel®.
Tip: As you try using some of the other Sage Functions, you'll notice that some of the functions require more than one argument, for example SgAccCustomerAgedBalance. In these cases, enter the criteria you want Excel® to return the result for, for example the Year and Period.
For more information
List of functions in Excel Integrated Reporting
|
To review Ask Sage, Business Advice and Health and Safety advice, go here. All contact details for Sage are available from here.
|
Go to top
|


